OAuth2 provider
Forgejo supports acting as an OAuth2 provider to allow third party applications to access its resources with the user’s consent.
NOTE: Scoped tokens or personal access tokens are entirely different from OAuth2; see the Access Token scope section for more information.
Forgejo can act as an instance-wide OAuth2 provider. To achieve that, OAuth2 applications must be created on the /admin/applications page.
NOTE: Third-party applications obtaining a token for a user via such an application will have administrative rights. OAuth2 scopes are not yet implemented.
Endpoints
| Endpoint | URL |
|---|---|
| OpenID Connect Discovery | /.well-known/openid-configuration |
| Authorization Endpoint | /login/oauth/authorize |
| Access Token Endpoint | /login/oauth/access_token |
| OpenID Connect UserInfo | /login/oauth/userinfo |
| JSON Web Key Set | /login/oauth/keys |
Supported OAuth2 Grants
At the moment, Forgejo only supports the Authorization Code Grant standard with additional support for the following extensions:
To use the Authorization Code Grant as a third-party application, it is required to register a new application via the “Settings” (/user/settings/applications) section. To test or debug, you can use the web tool https://oauthdebugger.com/.
Client types
Forgejo supports both confidential and public client types, as defined by RFC 6749.
For public clients, a redirect URI of a loopback IP address such as http://127.0.0.1/ allows any port. Avoid using localhost, as recommended by RFC 8252.
Git authentication
OAuth2 can be used as an alternative to a public SSH key or basic authentication (user/password) to obtain the required read or write access permissions. It relies on Git credential helpers such as:
They are both pre-configured server side but need to be installed and configured client side. The following example uses git-credential-oauth on a Debian GNU/Linux machine to authenticate on https://code.forgejo.org:
- download the binary tarball
- extract the binary in
/usr/local/bin/git-credential-oauth - verify it is found with
git credential-oauth - add the following to
~/.gitconfig(note thata4792ccc-144e-407e-86c9-5e7d8d9c3269is a hardcoded value that is identical for all Forgejo instances)[credential] helper = cache --timeout 7200 helper = oauth [credential "https://code.forgejo.org"] oauthClientId = a4792ccc-144e-407e-86c9-5e7d8d9c3269 oauthAuthURL = /login/oauth/authorize oauthTokenURL = /login/oauth/access_token git clone https://code.forgejo.org/earl-warren/testgit pushwill open a new page on the default browser, looking like this: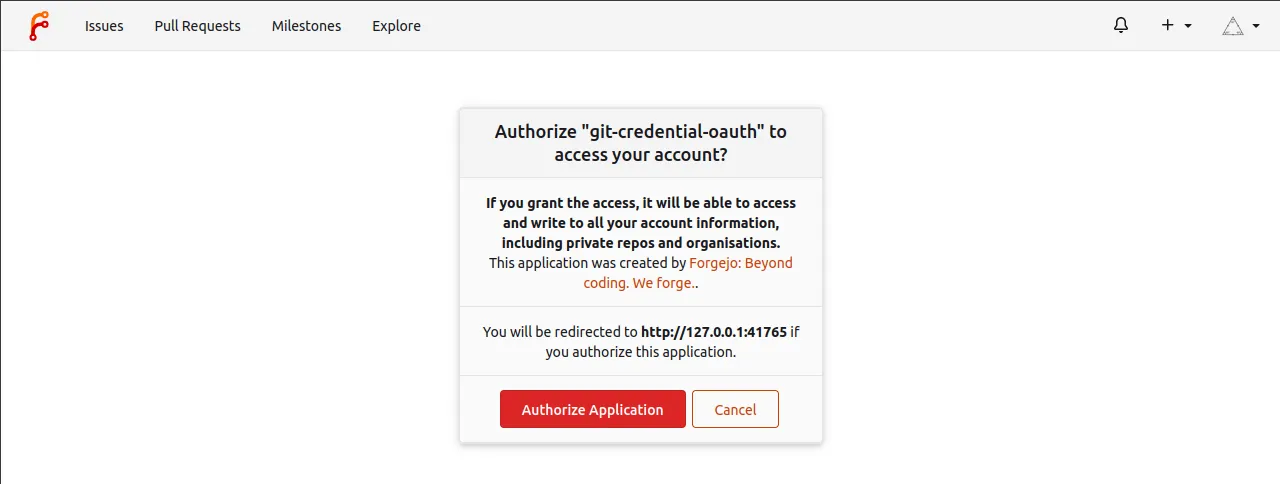
- subsequent
git pushwill reuse the token obtained from OAuth2 as long as it remains in the git credential-cache (i.e., 2h / 7200s)
NOTE: Scopes are not implemented for OAuth2 tokens and they can be used to execute any actions on behalf of the user, not just Git-related actions. Scoped application tokens or SSH keys limited to interactions with the repository should be preferred in environments where security is a concern.
It is possible for any user to manually register a new OAuth2 application on the /user/settings/applications page for the purpose of using Git credential helpers different from the pre-registered ones. In that case, the ~/.gitconfig setting (oauthClientId, etc.) needs to be adapted accordingly.
Examples
Using Codeberg as an authentication source
In this example, https://forgejo.example.com will be configured to add the option to delegate user registration to https://codeberg.org.
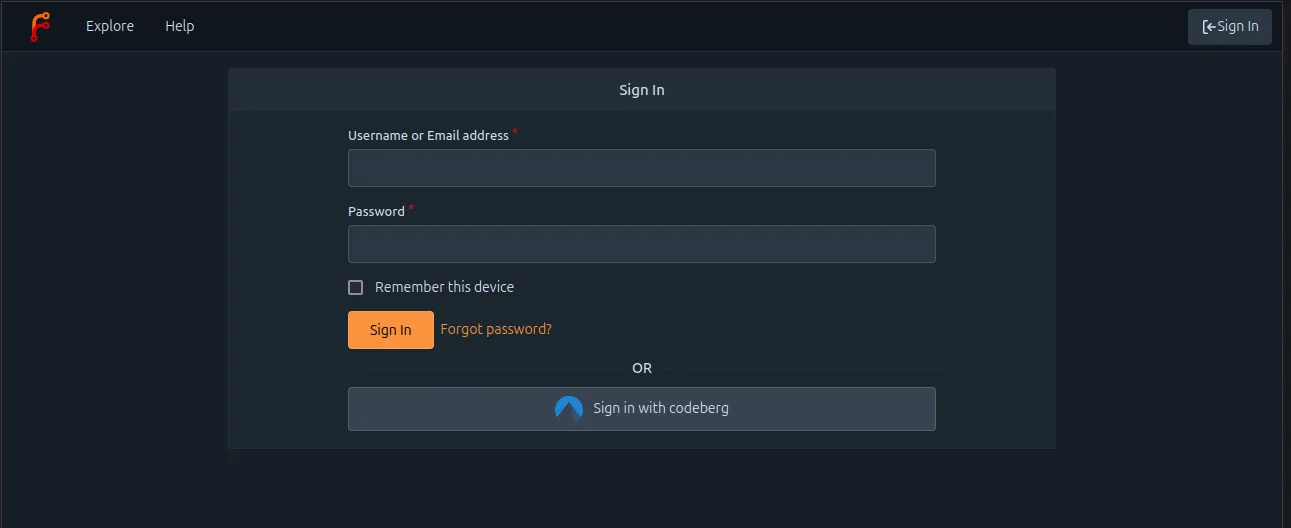
NOTE: In OAuth2 jargon,
https://forgejo.example.comis the OAuth2 client and Codeberg is the OAuth2 provider.
- Choose an arbitrary but distinctive name for the OAuth2 provider (e.g., Codeberg).
- Choose an existing Codeberg user to create the OAuth2 application. It does not need to be a user with elevated privileges (e.g., user-for-oauth-application).
- On https://codeberg.org, log in as user-for-oauth-application.
- Visit https://codeberg.org/user/settings/applications and create a new OAuth2 application. There needs to be only one redirect URI, composed with the arbitrary name that was chosen above:
https://forgejo.example.com/user/oauth2/Codeberg/callback.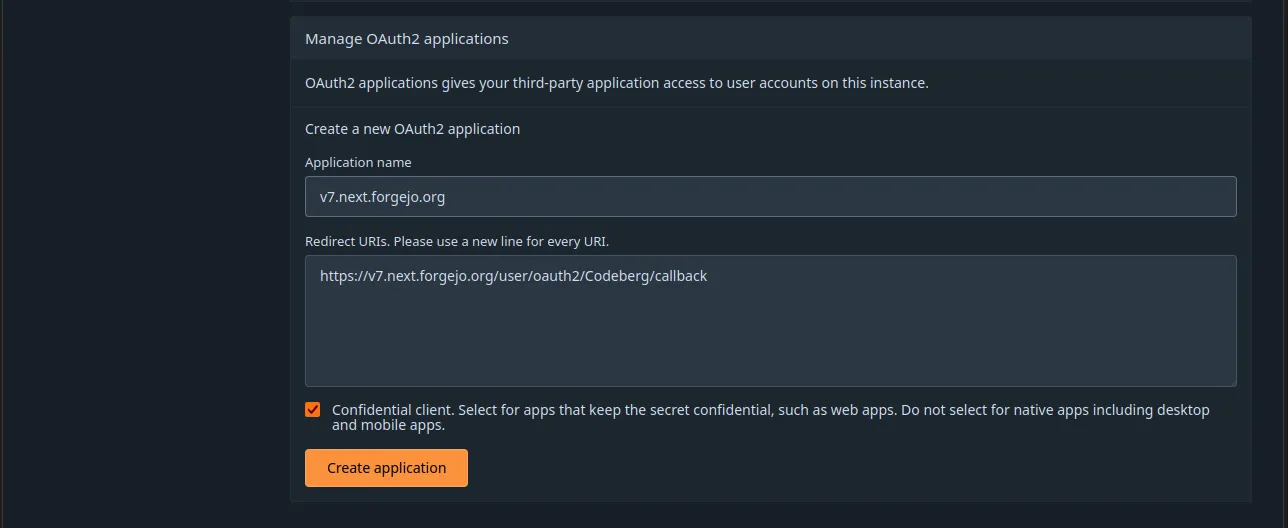
- When created, the OAuth2 application is given a Client ID and a Client secret that
https://forgejo.example.comwill need to let https://codeberg.org know it is an authorized OAuth2 client.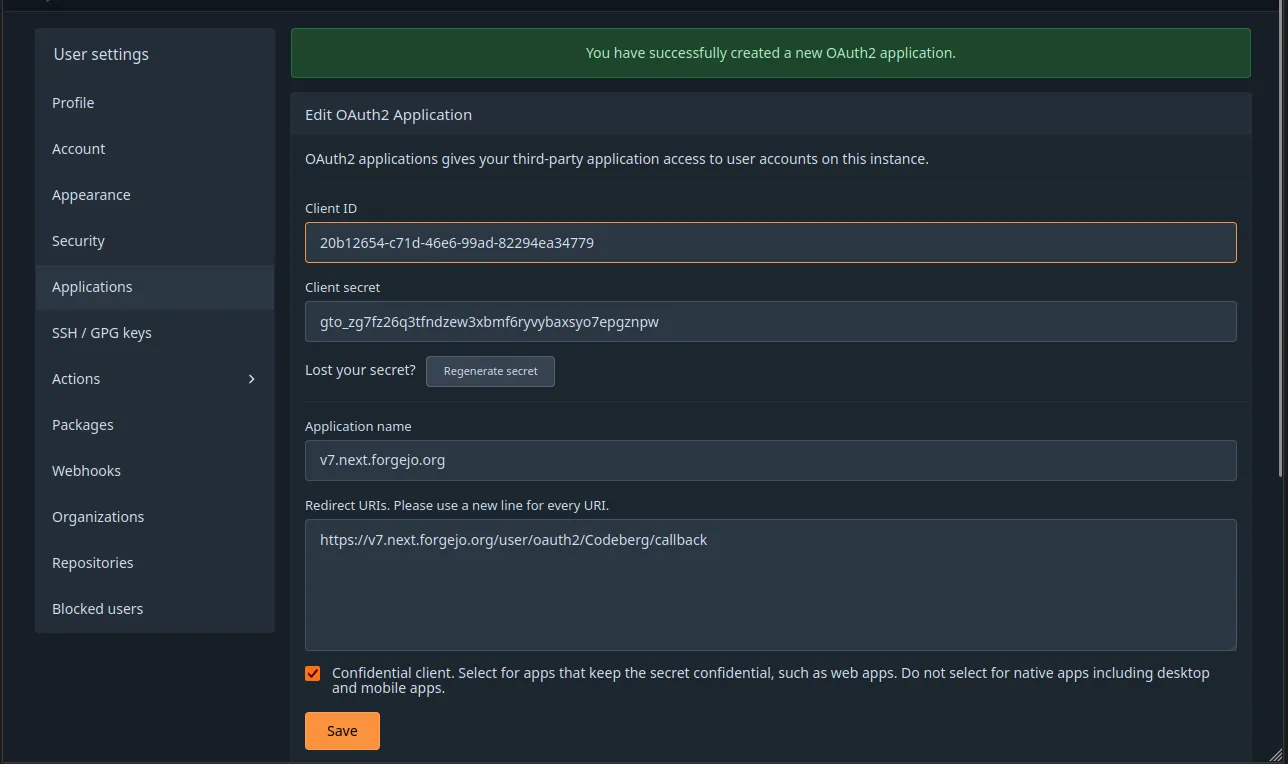
- Visit https://codeberg.org/user/settings/applications and create a new OAuth2 application. There needs to be only one redirect URI, composed with the arbitrary name that was chosen above:
- On
https://forgejo.example.com, log in as a user with admin privileges.- Create a new authentication source on
https://forgejo.example.com, the Forgejo instance that is going to act as the OAuth2 client, allowing its users to register using the account they have on https://codeberg.org.- Visit
https://forgejo.example.com/admin/auths/newto create the authentication source with:- Authentication type: OAuth2
- Authentication name: the arbitrary name that was chosen above (e.g., Codeberg)
- OAuth2 provider: OpenID Connect
- Client ID: copy/pasted from the OAuth2 application created on Codeberg
- Client Secret: copy/pasted from the OAuth2 application created on Codeberg
- Icon URL: https://design.codeberg.org/logo-kit/icon.svg
- OpenID Connect Auto Discovery URL: https://codeberg.org/.well-known/openid-configuration
- Leave all other fields at their default values.
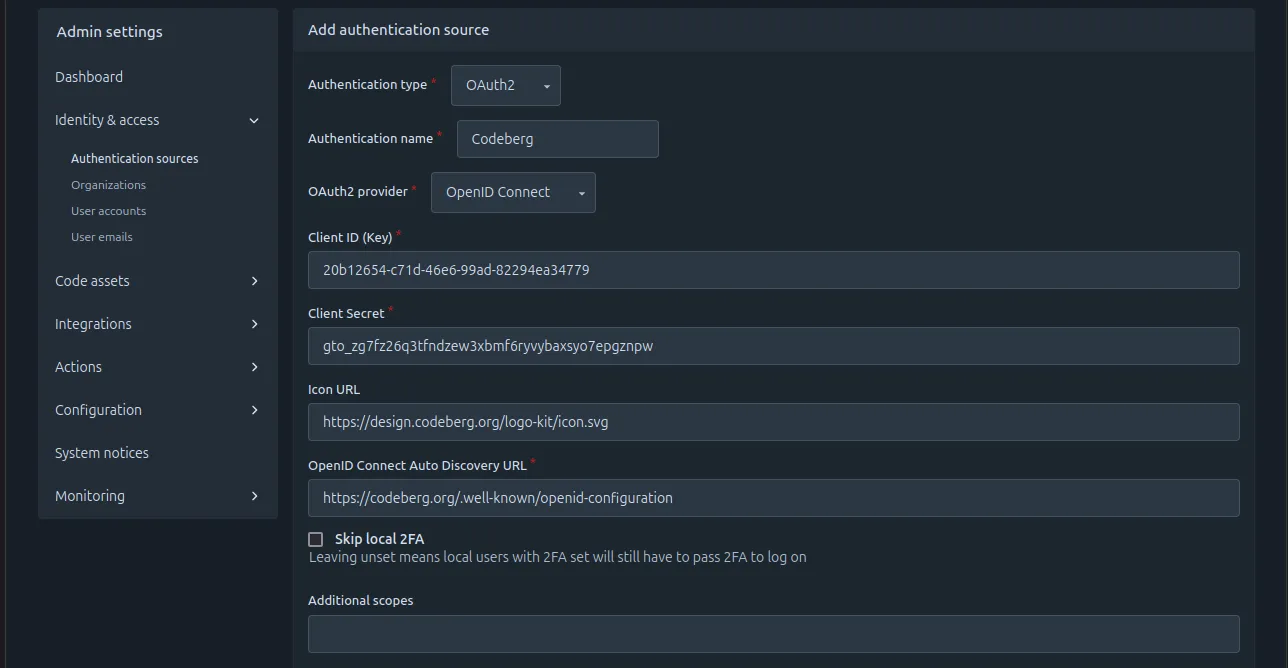
- It will show in the list of authentication sources at
https://forgejo.example.com/admin/auths.
- Visit
- Create a new authentication source on
- On
https://forgejo.example.com, not logged in.- Visit
https://forgejo.example.com/user/login.
- Click on Sign in with Codeberg to be redirected to Codeberg and authorize
https://forgejo.example.comto obtain the details of your account (user name, email, etc.). If you are not already logged in to Codeberg, you will need to before this authorization request is presented to you.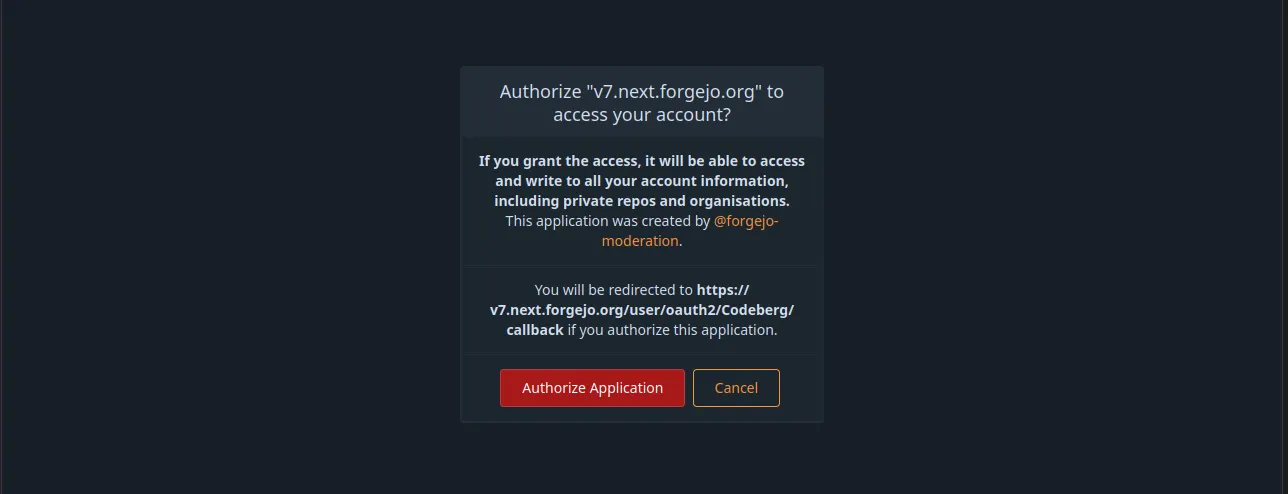
- Review the pre-filled information that will be used to create your account on
https://forgejo.example.com.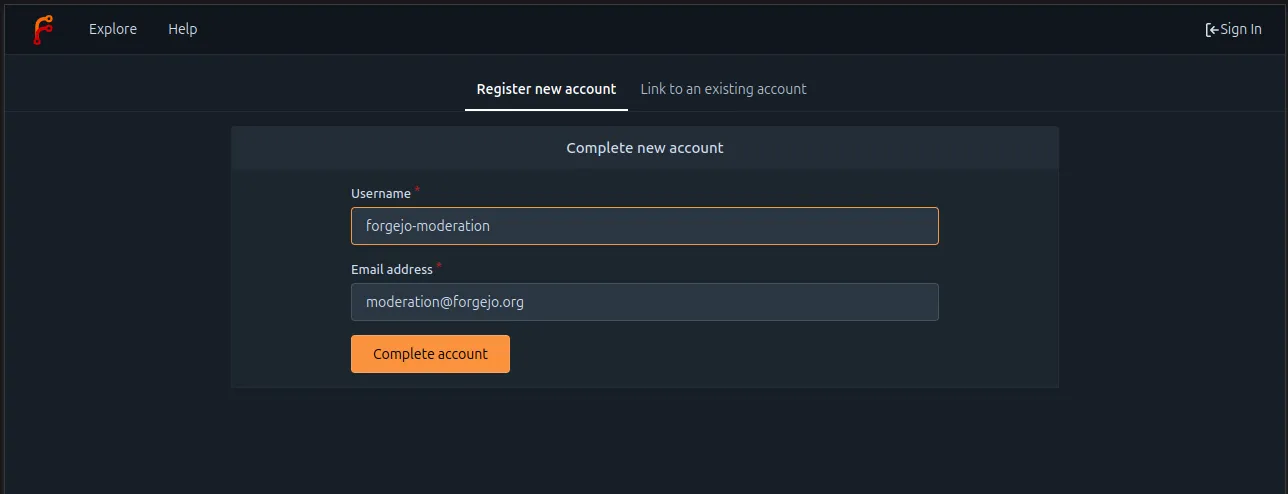
- You are redirected to the home page of the newly created account.

- Visit
Confidential client
Note: This example does not use PKCE.
-
Redirect the user to the authorization endpoint in order to get their consent for accessing the resources:
https://[YOUR-FORGEJO-URL]/login/oauth/authorize?client_id=CLIENT_ID&redirect_uri=REDIRECT_URI&response_type=code&state=STATEThe
CLIENT_IDcan be obtained by registering an application in the settings. TheSTATEis a random string that will be sent back to your application after the user authorizes. Thestateparameter is optional but should be used to prevent CSRF attacks.The user will now be asked to authorize your application. If they authorize it, the user will be redirected to the
REDIRECT_URL, for example:https://[REDIRECT_URI]?code=RETURNED_CODE&state=STATE -
Using the provided
codefrom the redirect, you can request a new application and refresh token. The access token endpoint accepts POST requests withapplication/jsonandapplication/x-www-form-urlencodedbody, for example:POST https://[YOUR-FORGEJO-URL]/login/oauth/access_token{ "client_id": "YOUR_CLIENT_ID", "client_secret": "YOUR_CLIENT_SECRET", "code": "RETURNED_CODE", "grant_type": "authorization_code", "redirect_uri": "REDIRECT_URI" }Response:
{
  "access_token": "eyJhbGciOiJIUzUxMiIsInR5cCI6IkpXVCJ9.eyJnbnQiOjIsInR0IjowLCJleHAiOjE1NTUxNzk5MTIsImlhdCI6MTU1NTE3NjMxMn0.0-iFsAwBtxuckA0sNZ6QpBQmywVPz129u75vOM7wPJecw5wqGyBkmstfJHAjEOqrAf_V5Z-1QYeCh_Cz4RiKug",
  "token_type": "bearer",
  "expires_in": 3600,
  "refresh_token": "eyJhbGciOiJIUzUxMiIsInR5cCI6IkpXVCJ9.eyJnbnQiOjIsInR0IjoxLCJjbnQiOjEsImV4cCI6MTU1NzgwNDMxMiwiaWF0IjoxNTU1MTc2MzEyfQ.S_HZQBy4q9r5SEzNGNIoFClT43HPNDbUdHH-GYNYYdkRfft6XptJBkUQscZsGxOW975Yk6RbgtGvq1nkEcklOw"
}
The
CLIENT_SECRETis the unique secret code generated for this application. Please note that the secret will only be visible after you created/registered the application with Forgejo and cannot be recovered. If you lose the secret, you must regenerate the secret via the application’s settings.The
REDIRECT_URIin theaccess_tokenrequest must match theREDIRECT_URIin theauthorizerequest. -
Use the
access_tokento make API requests to access the user’s resources.
Public client (PKCE)
PKCE (Proof Key for Code Exchange) is an extension to the OAuth flow which allows for a secure credential exchange without the requirement to provide a client secret.
Note: Please ensure you have registered your OAuth application as a public client.
To achieve this, you have to provide a code_verifier for every authorization request. A code_verifier has to be a random string with a minimum length of 43 characters and a maximum length of 128 characters. It can contain alphanumeric characters as well as the characters -, ., _, and ~.
Using this code_verifier string, a new one called code_challenge is created by using one of two methods:
- If you have the required functionality on your client, set
code_challengeto be a URL-safe base64-encoded string of the SHA256 hash ofcode_verifier. In that case, yourcode_challenge_methodbecomesS256. - If you are unable to do so, you can provide your
code_verifieras a plain string tocode_challenge. Then you have to set yourcode_challenge_methodasplain.
After you have generated these values, you can continue with your request.
-
Redirect the user to the authorization endpoint in order to get their consent for accessing the resources:
https://[YOUR-FORGEJO-URL]/login/oauth/authorize?client_id=CLIENT_ID&redirect_uri=REDIRECT_URI&response_type=code&code_challenge_method=CODE_CHALLENGE_METHOD&code_challenge=CODE_CHALLENGE&state=STATEThe
CLIENT_IDcan be obtained by registering an application in the settings. TheSTATEis a random string that will be sent back to your application after the user authorizes. Thestateparameter is optional, but should be used to prevent CSRF attacks.The user will now be asked to authorize your application. If they authorize it, the user will be redirected to the
REDIRECT_URL, for example:https://[REDIRECT_URI]?code=RETURNED_CODE&state=STATE -
Using the provided
codefrom the redirect, you can request a new application and refresh token. The access token endpoint accepts POST requests withapplication/jsonandapplication/x-www-form-urlencodedbody, for example:POST https://[YOUR-FORGEJO-URL]/login/oauth/access_token{ "client_id": "YOUR_CLIENT_ID", "code": "RETURNED_CODE", "grant_type": "authorization_code", "redirect_uri": "REDIRECT_URI", "code_verifier": "CODE_VERIFIER" }Response:
{
  "access_token": "eyJhbGciOiJIUzUxMiIsInR5cCI6IkpXVCJ9.eyJnbnQiOjIsInR0IjowLCJleHAiOjE1NTUxNzk5MTIsImlhdCI6MTU1NTE3NjMxMn0.0-iFsAwBtxuckA0sNZ6QpBQmywVPz129u75vOM7wPJecw5wqGyBkmstfJHAjEOqrAf_V5Z-1QYeCh_Cz4RiKug",
  "token_type": "bearer",
  "expires_in": 3600,
  "refresh_token": "eyJhbGciOiJIUzUxMiIsInR5cCI6IkpXVCJ9.eyJnbnQiOjIsInR0IjoxLCJjbnQiOjEsImV4cCI6MTU1NzgwNDMxMiwiaWF0IjoxNTU1MTc2MzEyfQ.S_HZQBy4q9r5SEzNGNIoFClT43HPNDbUdHH-GYNYYdkRfft6XptJBkUQscZsGxOW975Yk6RbgtGvq1nkEcklOw"
}
